Wednesday, November 23, 2011

OutRun Conversion Update

I haven't written about the OutRun conversion to C++ for some time. That's because I put it on hold whilst I focused on the anniversary edition, amongst other projects. Having a break was sensible and necessary, as it's such intense work.

Compared with other 68k conversions I've worked on professionally, this is much tougher, due to the sheer complexity and in some cases poor quality of the original code. Even after a first draft, a huge amount of refactoring will be needed so that the codebase can be extended.


Things are slowly coming together. Don't hold your breath whilst waiting for this; I'm doing it at a very steady pace. I've taken a screenshot of my desktop, which shows that much of the level data is now being parsed. Underlying this, many of the sprite rendering routines are ported. I've included a MAME screenshot for comparison so you can see what's currently missing. 

Sunday, November 13, 2011

OutRun Original Japanese Version

Japanese only static sit-down cabinet design with roof

Interior shot from a more beat-up cabinet. Note the unique bezel design

Following my comparison of Rev A and Rev B of the OutRun ROMs, I've turned my attention to the original Japanese release of the ROMs. There are a number of differences and bug fixes which are detailed below.

1. There is no backup RAM. Therefore, the code doesn't contain the routines to handle backup RAM found in later revisions. For example, the code to calculate backup RAM checksums.

2. The mini upright and standard upright cabinets are not supported. The revision only includes motor code for the deluxe sitdown. As a result, Dip switch bank B functions differently. Dip switch #1 toggles the motor hardware. Dip switch #2 toggles advertise sound. MAME currently emulates this dip switch incorrectly, assuming it to be the same as later revisions.

3. The default scores are different. For example, in the original version YU has 1,000,000 points. In later revisions this became 5,000,000.

4. The code to initialise default scores is called from a different routine.

5. The music selection screen is set to a 15 second timeout, rather than 30. SELECT MUSIC BY STEERING text is omitted.

6. The code to set the y position of the backdrop tilemap is different (e.g. the position of the cloud backdrop on coconut beach). In the original version, the tilemap immediately snaps to the horizon y coordinate. In later revisions, the tilemap will smoothly scroll to a new position.

7. Traffic logic changes. The code that determines when to flag other cars on the road as being near the player's Ferrari is different. This will presumably cause different behaviour when approaching packs of traffic. I'm unsure why the code has been changed or what situation the coders were trying to mitigate.

8. The code to set the speed of other cars when bunched in traffic has been changed. In later revisions, the speed is capped but in the original version a higher speed can be obtained by the traffic. This is noticeable at the start of the game. In later revisions the truck on the right hand side initially speeds off, but then the other cars catch up and bunch together around it. In the original, the truck accelerates away and the other cars never catch it. Without observing the presumably rare bug the coders were attempting to fix, it's tough to say why this change was made.

9. Later versions of the game contain an optimization to not add sprites that are off screen to the display list. This version does not contain this optimization.

10. As most players know, the stages are in a different order and there are layout differences in places in the original version. As such, certain routines differ to compensate for this when setting up stage palettes and sprite effects when driving offroad.

11. In later revisions, a safety counter was added to bonus mode in the main game's switch. (Bonus mode is the section of the game that increments your bonus score after completing stage 5.) This ensures that bonus mode exits eventually and presumably fixes a rare hang that can take place in this version.

12. This version does not attempt to terminate the crash animation sequence when entering bonus mode. Video of this bug on hardware here.

13. There are minor changes to ensure the y placement of some sprite objects (including those on the intro sequence and some in completion screens) more accurately reflect the y position of the blitted road layer.

Saturday, September 24, 2011

OutRun Rev A vs. Rev B

I've looked into the code changes between the revision A and revision B roms. Comparing the roms isn't easy, because the addresses of the routines are aligned differently rendering a binary compare impractical. Therefore, my technique was to align a rough decompilation of the Rev A code to the addresses of the Rev B code in IDA.

I manually compared the code. It was easy to see if a function had changed in size for example as subsequent functions would be shifted to different addresses. Clearly, this is prone to human error and I may have missed something. But, if I have, it should be minor.

The differences are:
  • Easter Egg activation is more complex in Revision B. I have blogged about this already here.
  • The steering wheel vibration code for the Upright Mini cabinet has been altered. In Revision B, the vibration frequency has changed to make it less aggressive. I would guess this must was done in response to hardware problems reported by operators. The code can be found at address 0xEBA2 in Rev A and 0xEC42 in Rev B. 
And that would appear to be it! Maybe not a huge surprise, given that I've not noticed any other differences playing the versions. I hope to compare the original version next, which may yield more interesting surprises. 

As a final note, only IC118 and IC133 change between the revisions. The sub CPU code is identical.

Monday, September 12, 2011

OutRun Philko Bootleg

Philko were a South Korean company, founded in 1985, responsible for manufacturing a number of arcade bootleg PCBs. They manufactured a good quality bootleg of OutRun, along with other Sega titles, before being prosecuted in 1989.


The OutRun bootleg is identifiable by the copyright message reading BETA as opposed to SEGA, as shown in the screenshot below.


Although the hardware is different to the original Sega boardset (see MAME source code for details), it turns out that the game code is identical to the standard Rev B edition. The only changes are in fact the copyright message, the patched rom checksum and the encoding detailed below. 

Bizarrely, Philko felt compelled to perform some crude encryption on their code by bitswapping it. As documented in the MAME source code, for the main CPU bits 11,12 and 6,7 should be swapped. For the sub CPU bits 14,15 and 2,3 should be swapped. 

There are at least two distinct revisions of the Philko PCB. Both revisions are three-layer boards. They have the same power and video connectors but a different edge connector for the controls. 

Here is an example of the first revision, kindly provided by Luke Wells. 


Here is an example of the second revision. Note that a custom processor (top middle) has replaced some of the sound section, and the control edge connectors are different (bottom left):


Here are some closeups I found on ebay:


Dip Switches are located on the Middle PCB (Board 2)

Board Dip switch banks are labelled as 1 & 2. These correspond to an original board as follows:
  • Dip switch bank 1 = Original board dip switch B 
  • Dip switch bank 2 = Original board dip switch A


Small Molex .1" - Video Connector
1-Red (Closest to power connector)
2-Green
3-Blue
4-Sync
5-Ground

18 Pin Connector - Controls

Component Side           | Solder Side
-------------------------|------------------------
1  (GND)-Brake Pot 1     | (GND)-Gas Pot 1            
2  (GND)-Steering Pot 1  |   
3  Steering Pot 2 (Wiper)|   
4  Gas Pot 2 (Wiper      |
5  Brake Pot 2 (Wiper)   |
6  Motor Control         |
7  Start Lamp*           |
8  (5v)-Brake Pot 3      |
9  (5v)-Steering Pot 3   |
10 (5v)-Gas Pot 3        |
11 (5v) From Supply      |
12 Test                  |
13 Start 1 |
14 Gear H/L              |
15 Coin 1                |
16 ?                     |
17 (GND)                 |
18 (GND)                 |

*using an LED connect the Cathode to Pin7 and the Anode to 5VDC

Here are photos of a bootlegged cabinet, provided by Francois:

Lots of differences! (Start button, Steering wheel, bezel etc.)

Bootleg cabinet interior shot. Click to enlarge

So this means a couple of things to bootleg board owners: I can potentially provide a version of OutRun Enhanced Edition if there's demand. Or owners can patch with a bitswapped Sega revision B romset, if they dislike the BETA copyright message.

Saturday, September 10, 2011

Turbo OutRun Boardset

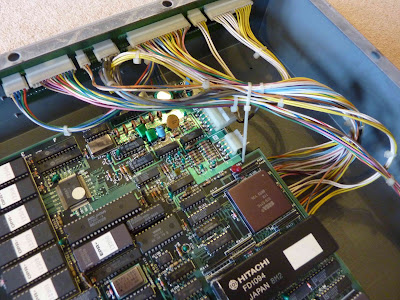
I picked up a Turbo OutRun boardset this week. Unlike OutRun, Sega decided to mount the board in a protective cage. The cage has its own internal wiring as shown below. 


The board was in very good condition, it didn't look the cage had ever been opened. The original serial (or selial) stickers were intact:


The board is still fitted with its original FD1094 suicide processor. I'm shocked that some of these are still working 22 years on! The white sticker on the processor reads: SEGA 317-0106.


Here's a closeup of the connections, for my own reference:


And here we have it running on the wiring harness made by RetroClinic. I took the board out of the cage to plug it in.


Tuesday, September 06, 2011

Space Harrier: Enduro Racer Edition

This is a customized version of Space Harrier, modified to run on Enduro Racer hardware.


This means that the game is fully playable on the Enduro boardset without the programmed security i8751 CPU.

Normally, if you try to run Space Harrier on Enduro Racer hardware, the game controls will not function and therefore the game is unusable.

I'd like to thank Mark at retroclinic.com for performing the hardware testing. Without him, this wouldn't have been possible as I don't own either boardset. Please note that currently this requires Enduro Racer hardware with the earlier YM2203 sound board.

Download here: sega_enhanced_v203.zip

Version 2.0.3: Space Harrier: Protection Fix #2 (Enemy shots getting faster over time)
Version 2.0.1:
Incorporated into Sega Enhanced package. Fixed lives bug. 
Version 1.0.1: JunoMan from Sega Resurrection suggested a more elegant solution. Results should be the same. Thanks! 
Version 1.0.0: Initial Release


Please note that no portions of the original game code are included in this package.

Thursday, August 11, 2011

Sega Enhanced [No Longer Supported]

Please note the latest version, OutRun: Enhanced Edition v2 is now available from here. I will leave this old version up for reference only. Please consider it no longer supported. 

This pack contains a collection of enhancements to original SEGA arcade games from the 1980s. It is intended to be used to reprogram the original hardware. Please note that no portions of the original game code are included in this package.

This software is free to use, but not to be sold or used in a commercial product or activity (i.e. do not sell programmed EPROMs on eBay!) For full details please read the license included in the package. 


The following titles are supported:
  • OutRun
  • Space Harrier
  • Super Hang-On
  • Limited Edition Hang-On


OutRun Enhancements:
  • High score saving using existing RAM (no hardware modification required)
  • Improved freeplay mode with attract; press start to begin
  • Music is played during the music selection (radio dial) screen
  • Dipswitch-selectable "MPH" / "km/h" speed display
  • Sound Test: Last Wave added
  • Initial Entry improvements and bugfixes

OutRun Bug-fixes:

Super Hang-On Enhancements:
  • Improved free play mode with attract; press START button to begin

Space Harrier Enhancements:
  • Patch Space Harrier to run on Enduro Racer Hardware. 

Compatibility, programming and installation instructions can be found in the documentation. 

I'd like to thank Darren Finck and Adrian Smethurst  for contributing to this project and for providing hardware testing. 

Older OutRun specific online documentation here.

Sunday, July 24, 2011

OutRun Controller Project

The aim of this project was to have a fully playable OutRun PCB in my lounge, without the overhead of the original controls or cabinet. As an extra requirement, I wanted to be able to swap the original control panel in if desired without any complex rewiring.


The original hardware consists of three analog controls: the accelerator, brake and steering. A perfect replacement pad appeared to be the Dreamcast controller. It contains two analog triggers, which we can map to acceleration and braking plus an analog thumbstick for the steering.

Unfortunately, the original Dreamcast pad uses hall effect sensors for the analog controls and would be unsuitable. Thankfully, many of the third party controllers aren't made to the same standard and instead use cheaper potentiometers, just like the original arcade hardware! In addition to this, there are plenty of digital buttons we can map to things like the gear change and the start button.


I plumped for a Madcatz Dreamcast pad. It's a nasty piece of work, but suitable for rewiring. I cut the original cable off, bypassing the pad's logic circuits and soldered wires directly onto the necessary components. One problem is that many of the components are connected via the pad circuity in a way that makes them unusable. For example, the buttons share a ground connection and the pots are also connected. You'll want to use a continuity tester and cut the PCB tracks between the components.


Thanks to some forum assistance, I found out that the connectors on the OutRun wiring harness are 'Amp Mate N Lok' which can be bought from Swallow Amusements. Using these connectors, I was able to create a wiring harness that would plug straight into the original OutRun wiring loom. It's possible to create your own plugs without buying an official (and expensive) crimping tool. You can simply add solder to the wire, press it into the crimping pin and hope it makes a firm connection. When it does, crush the crimping pin around the wire with some pliers. It might take some time to get it right, but you can still achieve decent results.


One other thing to note is that the OutRun 50P controller connector requires 5v to be sent to pins A24 and A25 or your controls won't work. An odd design decision on behalf of Sega it would seem. The pinouts for the ports can be found below; I've used brackets to denote pins that I didn't wire up:

AMP 50P

Pin A1 Coin Sw #2                     Pin B1  Coin Sw Ground
Pin A2 Coin Sw #1                     Pin B2  (Ground)           
Pin A3                                Pin B3  (Ground)
Pin A4 Shift Switch                   Pin B4  Shift Switch Ground 
Pin A5 Start Sw                       Pin B5  Start Sw Ground
Pin A6 Service Sw                     Pin B6  Service & Test Ground
Pin A7 Test Sw                        Pin B7  (Ground)               
Pin A8                                Pin B8  (Ground)
Pin A9                                Pin B9  (Ground)
Pin A10                               Pin B10 (Ground)
Pin A11                               Pin B11 (Ground)
Pin A12                               Pin B12 (Ground)
Pin A13                               Pin B13 (Ground)    
Pin A14                               Pin B14 Ground
Pin A15                               Pin B15 Ground
Pin A16                               Pin B16 (Ground)                
Pin A17                               Pin B17 (+5V)
Pin A18                               Pin B18 (+5V)
Pin A19                               Pin B19 (+5V)
Pin A20                               Pin B20 (+5V)
Pin A21 (Start Lamp Ground)           Pin B21 (Start Lamp)
Pin A22                               Pin B22 (+5V)
Pin A23                               Pin B23 (+5V)
Pin A24 +5V                           Pin B24 (+5V)
Pin A25 +5V                           Pin B25 (+5V)


AMP 20P

Pin A1 Accel Pot                      Pin B1 Steering Pot
Pin A2 Accel Pot Wiper                Pin B2 Steering Pot Wiper
Pin A3 Accel Pot                      Pin B3 Steering Pot
Pin A4                                Pin B4 Brake Pot
Pin A5                                Pin B5 Brake Pot Wiper
Pin A6                                Pin B6 Brake Pot 
Pin A7                                Pin B7
Pin A8                                Pin B8
Pin A9                                Pin B9
Pin A10                               Pin B10


Here's a video of the final setup in action!