I'd accumulated 4 broken or untested Power Drift PCBs. All four completely black-screened and showed no signs of life. I decided it was time to try to get at least one of them working. They are difficult boards to find working and I've always fancied playing the game in my OutRun cab.
Board 1 (The Easier Repair)
The Y-Board is complicated, using 3 68k processors, a z80 for sound and loads of custom chips. So when faced with a dead board, there are a lot of potential candidates. Using the scope, I could see the main 68K CPU was resetting every few seconds. There seemed to be good activity on the data and address lines however.
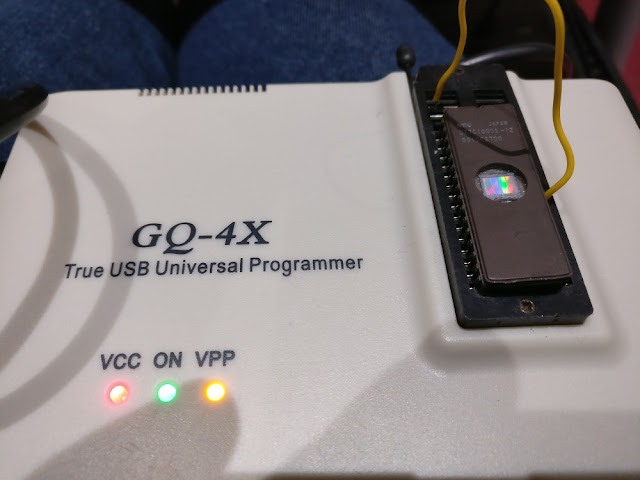
I tested the Main CPU EPROMs first and they all seemed to be bad?! To be honest, I don't know how much I trust the GQ-4X with 27C1000 EPROMs.... it seems inconsistent. But anyway, all the NEC D27C1000 branded ones failed romident. I programmed some new ones, and pinched a few others from one of the other spare PCBs.
The board then booted into life, but with lots of graphical corruption. Amazing - I've never had such an easy fix before. However, the game completely crashed after a short period of time.
Using the scope again I could see that the 'Sub X' CPU (Mame driver naming) had no activity on the data or address bus. The 'Sub Y' CPU seemed to be behaving sensibly. At this point I replaced ALL the NEC branding EPROMs for both CPUs.
The game then ran consistently without crashing, however there were occasional graphical errors.
I swapped the lower video PCB out with one of the other spares and this solved the remaining graphical issues. Unfortunately it was quite late at this point and I forgot to take photos of my progress.
So there you go - not really the most technical fix-log ever. But a fix is a fix, and I'll have a poke around the remaining 2 PCBs next. I also need to hook up some controls.


Board 2
Now that I had a fully working boardset from the previous repair it was easy to establish that I had 3 broken CPU boards and 3 partially working video boards with graphical errors remaining.
Picture shows the CPU board (courtesy of arcade.ym2149.com)

The CPU Board contains 3 x 68000 processors. These and known as the main CPU, X CPU and Y CPU. I initially investigated the main CPU signals and bus with my scope. I verified the EPROMs, then checked the SRAMs and buffer logic chips to ensure they were doing something sane. The PCB itself was filthy. Amusingly, pretty much every EPROM I pulled had a dead spider under it. One of them actually made me jump as it flew out at me with the chip! I was finding physical bugs, but no technical bugs, so it was time to move on!

I moved onto the X CPU. After working my way around the chips in the circuit I found little activity on the SRAM data and address lines. I piggybacked the first pair of SRAMs at IC 84 and IC 85, and to my delight the board booted. At this stage there were no zoomed sprites at all and lots of graphical errors. Only some of the static 2D sprites displayed correctly. However, I could coin up and hear sound and music which proved the main 68000 circuit and Z80 sound circuit were healthy.

I put the board into test mode. Things weren't completely readable but the screen could at least be compared with MAME. The tests reported 4 SRAMs and 2 EPROMs were bad in the X CPU circuit. However, this report couldn't be fully trusted at this stage due to the piggybacked RAMs. I tested the EPROMs that were reported bad and found them to fine to prove this point.

I socked two replacement 6164 SRAMs at IC 84 and IC 85.

I tested the old ones out of circuit and found them both to be faulty.

I booted the board again to verify the replacements were working. I then decided to piggyback the remaining two SRAMs that were also reported faulty by the internal tests at IC 82 and IC 83. They were right next to the previous bad ones and also similar Toshibas, so could in theory be bad as well. At this point I managed to see glimpses of the zoomed and rotated sprites that make up the game's road layer and backgrounds. The rotating Power Drift logo also showed signs of working.

After replacing IC 82 and IC 83, the game was running with scaled sprites.

The self-test now reported that everything was ok, including the video board SRAMs it had previously declared bad.

However, the game wasn't running correctly yet. At this point I swapped in the other video boards I had available to find the least broken candidate. This also proved that the CPU board was 100% worked and the remaining errors were on the lower video board.
This was all well and good, but I had no easy way of accessing the lower video PCB. This is where a set of interconnects built by UKVAC's ColinD came in handy. I'd had these sat in a box for months, but never had the need to construct them. I soldered them together, and could now separate the PCBs whilst powered up.


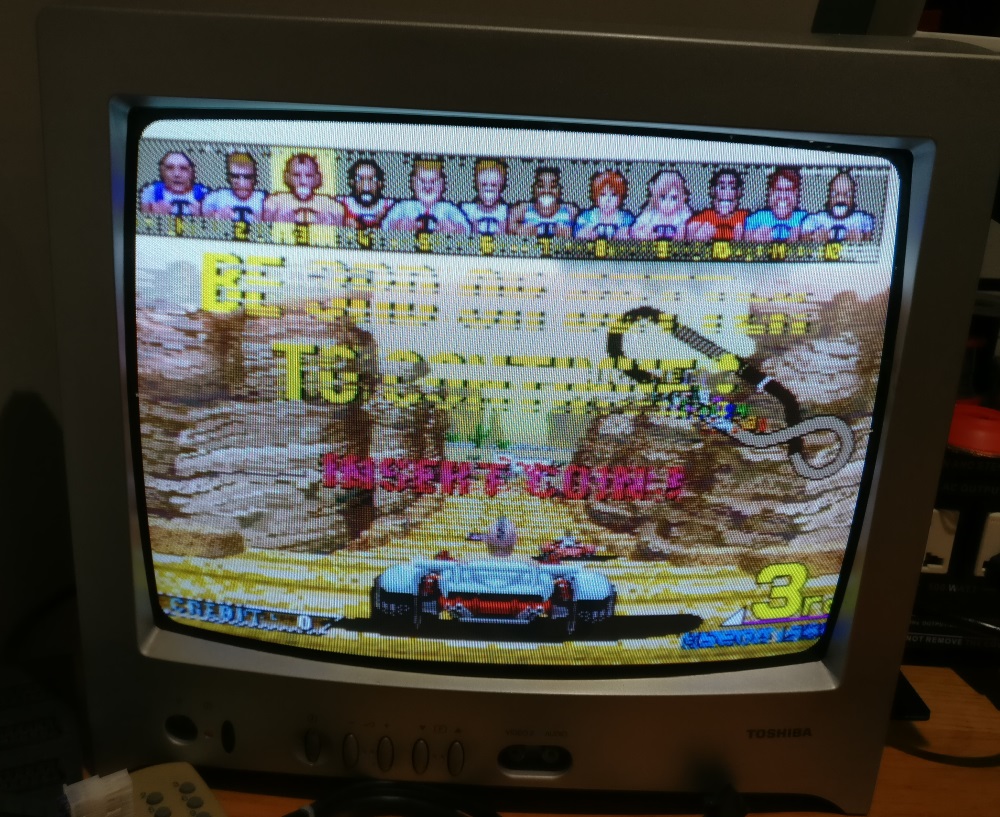
Now here's where things got quirky. The video boards all exhibited problems with the 2D static HUD sprites. For example, the "BE 3RD OR BETTER TO CONTINUE" graphic had jailbars. This would often be the sign of a bad line on an EPROM, SRAM or logic chip. I knew the SRAMs were good from the on-board tests so I turned to the EPROMs which weren't tested by the on-board routines.

Using my Sega Sprite Viewer tool, I could tell that these graphics were located in two interleaved EPROMs: epr-11789 at IC 16 and epr-11791 at IC 14.

As a first check I verified the EPROMs out of circuit. I had a little trouble reading them, but eventually got a good read. I put this down to the GQ-4X being a little quirky with 27C1000 EPROMs. I've had trouble in the past with them despite using the recommended jumper wire.
However, I was now really stumped as to what the problem was. I swapped in two EPROMs from another broken video board and got a different visual problem in the same area. I swapped another set in from a different video board and got yet another different problem with the graphics!!
I was really pulling my hair out and spent quite a lot of time checking various stuff. As a last resort, I programmed a new EPROM.

And what do you know... Isn't that unbelievable that EVERY video board had the same damaged EPROM? Maybe there's something about the board's construction that causes this.


Next step will be to verify the controls. I'll do this once the following PCB arrives from Alex that allows you to connect a PS2 controller on the bench for testing and a lot of other nifty stuff. But we'll cover that another time! I may have a (short) break from fixing Power Drift boards for now.

Board 1 (The Easier Repair)
The Y-Board is complicated, using 3 68k processors, a z80 for sound and loads of custom chips. So when faced with a dead board, there are a lot of potential candidates. Using the scope, I could see the main 68K CPU was resetting every few seconds. There seemed to be good activity on the data and address lines however.
I tested the Main CPU EPROMs first and they all seemed to be bad?! To be honest, I don't know how much I trust the GQ-4X with 27C1000 EPROMs.... it seems inconsistent. But anyway, all the NEC D27C1000 branded ones failed romident. I programmed some new ones, and pinched a few others from one of the other spare PCBs.
The board then booted into life, but with lots of graphical corruption. Amazing - I've never had such an easy fix before. However, the game completely crashed after a short period of time.
Using the scope again I could see that the 'Sub X' CPU (Mame driver naming) had no activity on the data or address bus. The 'Sub Y' CPU seemed to be behaving sensibly. At this point I replaced ALL the NEC branding EPROMs for both CPUs.
The game then ran consistently without crashing, however there were occasional graphical errors.
I swapped the lower video PCB out with one of the other spares and this solved the remaining graphical issues. Unfortunately it was quite late at this point and I forgot to take photos of my progress.
So there you go - not really the most technical fix-log ever. But a fix is a fix, and I'll have a poke around the remaining 2 PCBs next. I also need to hook up some controls.


Now that I had a fully working boardset from the previous repair it was easy to establish that I had 3 broken CPU boards and 3 partially working video boards with graphical errors remaining.
Picture shows the CPU board (courtesy of arcade.ym2149.com)

The CPU Board contains 3 x 68000 processors. These and known as the main CPU, X CPU and Y CPU. I initially investigated the main CPU signals and bus with my scope. I verified the EPROMs, then checked the SRAMs and buffer logic chips to ensure they were doing something sane. The PCB itself was filthy. Amusingly, pretty much every EPROM I pulled had a dead spider under it. One of them actually made me jump as it flew out at me with the chip! I was finding physical bugs, but no technical bugs, so it was time to move on!

I moved onto the X CPU. After working my way around the chips in the circuit I found little activity on the SRAM data and address lines. I piggybacked the first pair of SRAMs at IC 84 and IC 85, and to my delight the board booted. At this stage there were no zoomed sprites at all and lots of graphical errors. Only some of the static 2D sprites displayed correctly. However, I could coin up and hear sound and music which proved the main 68000 circuit and Z80 sound circuit were healthy.

I put the board into test mode. Things weren't completely readable but the screen could at least be compared with MAME. The tests reported 4 SRAMs and 2 EPROMs were bad in the X CPU circuit. However, this report couldn't be fully trusted at this stage due to the piggybacked RAMs. I tested the EPROMs that were reported bad and found them to fine to prove this point.

I socked two replacement 6164 SRAMs at IC 84 and IC 85.

I tested the old ones out of circuit and found them both to be faulty.
I booted the board again to verify the replacements were working. I then decided to piggyback the remaining two SRAMs that were also reported faulty by the internal tests at IC 82 and IC 83. They were right next to the previous bad ones and also similar Toshibas, so could in theory be bad as well. At this point I managed to see glimpses of the zoomed and rotated sprites that make up the game's road layer and backgrounds. The rotating Power Drift logo also showed signs of working.

After replacing IC 82 and IC 83, the game was running with scaled sprites.

The self-test now reported that everything was ok, including the video board SRAMs it had previously declared bad.

However, the game wasn't running correctly yet. At this point I swapped in the other video boards I had available to find the least broken candidate. This also proved that the CPU board was 100% worked and the remaining errors were on the lower video board.
This was all well and good, but I had no easy way of accessing the lower video PCB. This is where a set of interconnects built by UKVAC's ColinD came in handy. I'd had these sat in a box for months, but never had the need to construct them. I soldered them together, and could now separate the PCBs whilst powered up.


Now here's where things got quirky. The video boards all exhibited problems with the 2D static HUD sprites. For example, the "BE 3RD OR BETTER TO CONTINUE" graphic had jailbars. This would often be the sign of a bad line on an EPROM, SRAM or logic chip. I knew the SRAMs were good from the on-board tests so I turned to the EPROMs which weren't tested by the on-board routines.
Using my Sega Sprite Viewer tool, I could tell that these graphics were located in two interleaved EPROMs: epr-11789 at IC 16 and epr-11791 at IC 14.
As a first check I verified the EPROMs out of circuit. I had a little trouble reading them, but eventually got a good read. I put this down to the GQ-4X being a little quirky with 27C1000 EPROMs. I've had trouble in the past with them despite using the recommended jumper wire.
However, I was now really stumped as to what the problem was. I swapped in two EPROMs from another broken video board and got a different visual problem in the same area. I swapped another set in from a different video board and got yet another different problem with the graphics!!
I was really pulling my hair out and spent quite a lot of time checking various stuff. As a last resort, I programmed a new EPROM.


And what do you know... Isn't that unbelievable that EVERY video board had the same damaged EPROM? Maybe there's something about the board's construction that causes this.