Friday, May 29, 2020

Sega X-Board Memory Test Software

A set of ROM images to test the RAM ICs and custom chips on Sega X-Board hardware (AfterBurner, Thunderblade etc.). It is more robust than the on-board tests and stands a better chance of running on a dead boardset.

  • It does not require working main RAM to actually run the main RAM test.
  • Remove all sub CPU EPROMs when installing (IC 20, IC 29 etc), as these interfere with the results.
  • It requires a vanilla 68K CPU to be installed, not the FD1094 security processor present on some X-Board games.
  • The palette will be incorrect when used on games other than AfterBurner. But it should still operate correctly. 

This was not previously released, because I hadn't verified the IC labeling on hardware. However, a number of people have already used this software to successfully fix PCBs. Therefore, I figured I should get this out there and address problems as they are reported.

This is based on the OutRun Memory Test. The modified (and messy) source code is available here

The compiled ROM images can be downloaded here

Wednesday, April 29, 2020

OutRun: Enhanced Edition 2.02

OUTRUN: ENHANCED EDITION V2.02

OutRun: Enhanced Edition is a set of 7 replacement EPROMs intended for use on original OutRun arcade hardware. 


It fixes many bugs present in the final official codebase (Rev. B), and introduces new features to extend the life of the game, including: 

  • Working Free Play Mode
  • High Score Saving
  • Additional High Score tables
  • 3 additional in-game audio tracks
  • Best Track Time (aka ‘Lap Time’) records
  • New and old course layouts
  • Software DIP Switch support
  • Cheats - including infinite time and the ability to disable traffic
  • Optional car handling modifications

Full documentation and installation instructions


To register:
1/ Complete this form

Sunday, March 08, 2020

Space Harrier: The protection strikes back!

This is a guest post from Adrian Smethurst

It was back in January 2015 when I first started looking into the Space Harrier code on reports of a ‘bug’ which gave the player ‘extra' lives when they lost a life.  This ‘bug' only affected the game when played in either MAME, on an Enduro Racer converted board or a bootleg Space Harrier board.  It turns out that it wasn’t a bug but rather a time delayed protection mechanism created by Sega to try and hit the arcade operators, who bought bootleg Space Harrier boards back in the mid 80’s, in the pocket.  You can read more about that here.

Space Harrier PCB with Intel 8751 Microcontroller

Fast forward 5 years and a conversation I was having with respected indie game dev and creator of Fortress Craft, Adam Sawkins (ex. Criterion and Codemasters) about Space Harrier, at Arcade Club Leeds.  He asked me why, after the game had been powered up for a while, the enemy shots would start to come at the player faster and faster, to the point where you’d need lightning quick reflexes to simply avoid them.  He also told me that a reboot of the game would reset the enemy shot speed back to normal again, for a short while.  Hearing this news immediately sent my mind drifting off to a time 5 years previously when I’d investigated (and presumably fully defeated) the time delayed protection in Space Harrier.

So that night I went home and stated looking further into the Space Harrier code…

The heart of the protection is built around the ‘in-game’ timer.  This is a 6-byte timer located at address $40020 in main CPU address space.  The first 4 bytes of the timer represent the ‘seconds’ of in-game time played and the final 2 bytes represent the sub-second (frame) timer.  The timer is reset to zero at the start of each new game.  The timer is only incremented during normal gameplay, attract mode gameplay doesn’t increment the timer.  Every vertical blank the sub-second timer is incremented and compared with a value of 61 (yes, it’s a bug!).  If the sub-second timer is greater than 61 then it’s reset to zero and the ‘seconds’ part of the timer is incremented.  This means that, due to the bug, 1 second on the ‘in-game’ timer is actually 62 frames of gameplay, rather than 60.  The code that increments the ‘in-game’ timer is at address $1514 (it also updates the power-on timer located at memory address $40000 at the same time).

During every frame of normal gameplay code at address $4aae checks if the ‘in-game’ timer is at a multiple of $200 (this should, in theory, have been every 512 seconds but due to the bug mentioned above is actually every 529 seconds) and if it is the following code is executed :-

004ACC: move.w  $12444e.l, D0   
004AD2: move.w  $404ee.l, D1
; d0 and d1 never seems to contain a value other than 0 after many hours of gameplay testing
004AD8: eor.w   D1, D0          ; d0 = d1 XOR d0               
004ADA: cmp.w   $40090.l, D0    ; compare d0 with value at $40090.w
004AE0: blt     $4af0           ; branch if d0 < contents of $40090.w

If the 'branch less than’ condition is false (i.e. IF d0 < contents of the word memory @ $40090) then

004AE4: addq.w  #1, $4008e.l    ; trigger ‘previously unknown’ protection
004AEA: addq.w  #1, $400f0.l    ; trigger the 'increase lives' protection

When I was investigating the protection routine 5 years ago I completely failed to consider the first of these 2 instructions and only concentrated my efforts on investigating the second one.  This is because, at the time, I’d only been made aware of the ‘increasing lives’ issue.  So at the time I worked backwards from the ‘number of lives' counter to find out what was increasing the number of lives.  From there my investigations led me back to the instruction at address $4aea.  At that point I wrongly assumed that the ‘increasing lives’ issue was the only side effect of the protection routine.

How wrong I was…

The word value at address $4008e is directly related to the game difficulty.  It’s a value that's set initially by the boot-up code reading the ‘difficulty’ settings from dip switch B and is set as follows :-

EASY/MEDIUM     0
HARD            1
HARDEST         2

The code which does this is at address $2d7c.  This value is then subsequently used as part of the calculations in the routine which handles the enemy shots at address $b9d2.  It’s easy to tell that that routine handles enemy shots as if you change the first word of the routine from $08ed to $4e75 (RTS) the enemies will no longer fire shots at the player during gameplay.  The higher the value at address $4008e, the faster the enemy shots head towards the player.

Ordinarily the difficulty value at address $4008e would NEVER change after boot, assuming the game code is running on a genuine Space Harrier board with the 8751 MCU present.

However, as you can see from above, the instruction that I completely ignored 5 years ago, INCREMENTS that value (and hence the difficulty level) every 529 seconds of in-game play.

What this effectively means is this - if you power up the board from cold, ensure the difficulty setting on dip switch B is set to EASY and complete the game (assuming roughly 18 minutes for a full playthrough, although I have seen people complete the game in around 17 minutes) then the difficulty will be at the HARDEST level by the time the game completes.

And it will keep getting harder for each 529 seconds of completed ‘in-game’ time.  This is because the value at $4008e is only reset by either rebooting the game or dropping in and out of service mode.  It ISN’T reset at the start of each new game.

It’s very easy to see the results of a higher value at address $4008e by simply changing it via the MAME debugger and playing the game.  Values of 6 and above (which would represent just 3 or 4 full playthroughs from starting on EASY difficulty) make the game almost impossible to play as the enemy shots head towards the player with such high velocity..

Taking a step back, I feel it’s likely that the 8751 MCU probably exposes a value of 1 at address $40090 (it could in theory be any value between 1 and $7fff for the conditional branch instruction at address $4ae0 to pass but 1 is the most likely value, IMHO).  The updated patch has been added to the Sega Enhanced package here.

I hope that this finally lays to rest the protection in Space Harrier.

Saturday, February 29, 2020

Bringing Turbo OutRun Audio to OutRun: Rush A Difficulty

Following Camino’s optimization, I performed a similar treatment on Cruising Line, the remaining 3DS track. I reduced the track’s filesize from 24K to 9K using a similar set of techniques. Cruising Line does not suffer from the quantization issues that plagued Camino, which made the process a little easier and yielded even better results. So far so good and there was plenty of ROM space left to stuff with additional music! The next Enhanced Edition will contain three new audio tracks, which is an amazing result.

Originally, I considered bringing the new Switch music into the fold: Radiation and Step On Beat. However, from a subjective point of view, neither of these tracks are particularly great. I felt like they didn’t sit harmoniously with the existing music, and I wasn’t prepared to spend many weeks optimizing music I didn’t love.

Turbo OutRun - A prime example of what happens when you don't understand your own product.

Instead, I turned to another reference point in the OutRun universe - Turbo OutRun. Whilst Turbo OutRun is arguably a disappointing sequel, the soundtrack is impressive. In particular, Yasuhiro Takagi’s ‘Rush a difficulty’, which is an upbeat number that wouldn’t sound out of place in the original game. As an aside, Takagi went on to become sound director for Shenmue II, before moving to the Yakuza series.


Rush A Difficulty. Terrible Name. Amazing Track.

Turbo OutRun runs on the same hardware as its predecessor so, on the surface, the idea of converting the music might appear simple. Being a hand-crafted piece of MML, we wouldn’t need to worry about the rigorous optimization process required by the 3DS audio. However, the audio engine embedded in the Z80 program code isn’t identical. Between OutRun and Turbo OutRun Sega added a number of improvements to the engine. Firstly, an extra 3 PCM channels can be utilized by music, bringing the overall number of simultaneous samples to 8, bolstered by the usual 8 FM channels. (On OutRun, these 3 channels are strictly reserved for sound effects and can’t be used by music.) Secondly, samples can be played at different pitches. Let’s say the composer took a sample of an electric guitar chord, this could be triggered at different pitches and replayed like an instrument. AfterBurner used this functionality to great effect with its guitar-laden riffs. Whilst the samples are 8-bit, and relatively lo-fi compared with clean Yamaha FM patches, they add depth and grit to the overall mixdown when used wisely. In order to backport the music to OutRun, considerable changes would be needed.

So, the Turbo OutRun engine uses additional channels and manipulates sample pitch intelligently. It was time to decompile the necessary sections of Turbo OutRun’s Z80 code to start analyzing the raw music data. A starting point was the PCM channels, as we potentially needed to remove or remap the extra ones. It was immediately clear that 2 PCM channels were permanently disabled. Interestingly, the disabled channels contained an early draft or a guitar riff for the tune that sounded unfinished when reactivated. This was good news, as it meant there was only one extra channel of audio to worry about. The extra channel contained a sampled driven slap-bass line. Converting this back to OutRun would be problematic. It would involve finding space for the slap-bass sample in the, almost full, sample ROMs and backporting the pitch manipulation code. Plus there wasn’t a spare PCM channel to use anyway, so this was a non-starter.

The bass line was an essential ingredient of the track - it sounded sparse without it. I decided to recreate the bassline as a YM patch/instrument. CMonkey had the great idea of sourcing a patch from a Megadrive rendition of Rush a Difficulty. The patch wasn’t perfect, but proved a good starting point for further manipulation. I used the VOPM plugin, which emulates the Yamaha 2151 chip, to modify the patch further, before converting the data back to the format required by the OutRun engine.

VOPM Plugin. Spend ages fiddling with knobs

A YM patch will never sound as beefy as a sample, but it’s not a bad compromise. I replaced a, sparsely used, existing YM channel that didn’t contain a strong lead with the bassline.

Audio Comparison

The next hurdle was remapping the track’s percussion. The Turbo OutRun music utilises a different set of drum samples. Now, we could theoretically replace all six sample EPROMs on the PCB with larger ones to include these new drums, and solder the corresponding jumper. But at a practical level, this seems like a big ask on the poor user just for the drums on a single track! Most of the Turbo OutRun drums have an equivalent in OutRun - kick drum, snare, hi-hats, tom-toms etc. Whilst the OutRun drumset doesn’t contain as much reverb, this seemed like a sensible compromise for now.The only one that’s missing is the cowbell, which I mapped to a wood rim instead.

One final change was needed. The entire Turbo OutRun engine runs at a different timing value to OutRun. To work in OutRun, the engine needs to be temporarily patched to the Turbo value, but only whilst the music is playing. I have a temporary fix for now, which will need to be improved before release. So finally, the track is successfully converted. The main differences are: remapped drum samples, the sampled bassline replaced with a YM patch, with the resulting loss of a single YM channel.


Sunset Rush (The Enhanced Edition Remix)

So there we have it. A different challenge to optimizing the 3DS music that entailed rewriting existing tooling, decompiling the Turbo OutRun audio engine and converting the MML data and commands to an older format.

I’d also like to thank cmonkey, without his assistance this would have taken much longer. When working on a project of this nature it's invaluable to have someone to bounce ideas off, challenge your assumptions, and sometimes make you feel (unintentionally) ridiculous. I've been incredibly lucky to find someone who understands the Sega audio engine as well as he does, and I wish I could say more than, "thanks buddy!"

Tuesday, February 25, 2020

Space Harrier Bootleg Cabs

It's always fun to see the effort bootleggers went to, to completely reproduce an entire arcade game. Here are two rare, and different, examples of a Space Harrier upright. 


Here's the first. Note the unique marquee and dubious side art. The Space Harrier logo is incomplete. The Sega logo is completely missing. The shading details are omitted.  Presumably this was converted to Enduro Racer at some stage, hence the handlebars.


Here's the second. This sports a Sega logo and the side-art is much more accurate. But there are many cabinet design differences from a genuine upright. For example, the screen bezel is completely different. The marquee is a different size, clipping the artwork. 


Here are the PCB stack and internals. Those familiar with the original boardset will note the additional daughter boards to replace various Sega customs. Overall, a lot of effort went into this reproduction. 


You can see other bootleg Sega cabs here

Wednesday, February 12, 2020

Sega Arcade: Pop-Up History - Review

Read Only Memory has a formidable track record of publishing high-end game books, so I was particularly excited when Sega Arcade: Pop-Up History was announced. Models of six Sega Taiken arcade cabinets delivered via a pop-up book, providing a double-dose of childhood nostalgia in both subject matter and delivery format.


The presentation follows the clean, minimal, design patterns established by ROM’s other titles. Screenshots are used sparingly and rendered with a faithful scanline effect. Less is more, with a solitary image on most pages isolated by plenty of white-space. The most fascinating content, other than the pop-up models, is the restored concept cabinet designs from Sega’s archives. Whilst not exhaustive, (there is a far wider range of concept imagery in Yu Suzuki’s GameWorks Vol. 1 for example) this is the clearest presentation of the artwork. It’s insightful to glimpse the design process behind the games we know and love. Hopefully one day the full treasure trove will be published.


The accompanying prose perfectly captures the magic these machines first invoked for gamers, alongside the technical practicalities of the hardware itself. Keith Stuart is one of the best game writers in the business and he has passed his homework with flying colours: Yu Suzuki is consulted and quoted, old developer interviews referenced and fanatic arcade collectors contacted. A lot of ground is covered in a small amount of space. I’m partially biased as I was lucky enough to advise on this area of the book. As such, I hope it avoids perpetrating the common myths surrounding these machines, as well as proving both insightful and accurate!


The pop-up models are quite rightly the centrepiece of this book. I was intrigued at how intricate they were - especially the AfterBurner model, although my technical expertise in the field is limited to books I read to my children! That being said, the proportions, artwork and overall feel is spot on. Clearly, some of the curved surfaces are not fully reproducible when transferred to folded paper, but for tabletop novelty factor, this can’t be beat! The only similar product I’m aware of is Dorimaga magazine’s Sega papercraft series. This was published over 15 years ago and required the reader to construct the models with scissors and glue.


One thing to note is that this book isn’t an analogue to a title like MegaDrive: Collected Works. There are only 32 pages of editorial content, as opposed to over 300. You purchase this book for the quality of the pop-up models themselves. And so you should. After all, where else can you find a product quite like this?


Monday, January 20, 2020

The Incredible Shrinking Camino!

When creating the 3DS and Switch versions of OutRun, developer M2 added a number of new music tracks. Thankfully, most adhered to the original Music Macro Language (MML) format used by the original game. Once extracted from the 3DS, the music data plays out of the box on original hardware, with minimal modifications to the Z80 program code. Delightful dedication on behalf of the composers. 

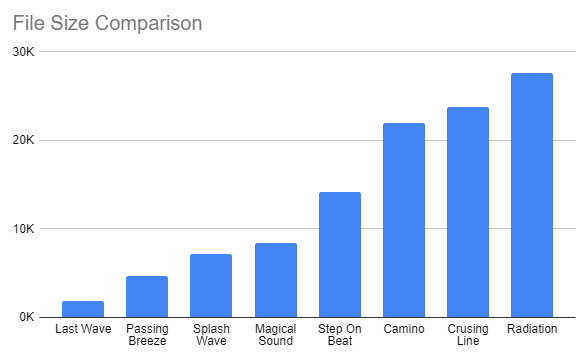
Unfortunately, as mentioned in the previous blog post, the file size of this new music is substantially larger than the original music. As a comparison, the new tracks weigh in at around 3-4 times the size.


This isn’t a result of additional length or musical complexity. File size is simply not a concern on modern hardware. However, my dream is to add multiple music tracks to a future release of OutRun Enhanced Edition. This relies on the hope that they could be reduced in size and programmed back to the original arcade PCB, without the need for additional hardware. As such, I’ve spent my evenings studying and optimizing the first OutRun 3DS tune: Camino a Mi Amor.


The original music was composed by Hiro on a Roland MC-500 keyboard and transcribed as sheet music, before being hand translated to MML. This ensured the original MML was well structured and highly optimized. After coding an MML decompiler, I could study the new music and determine why there is a size disparity, and more importantly recompile any optimizations back into the OutRun audio engine.  

It was clear that the new MML data was auto-generated by some kind of tooling. I believe that the new audio was composed in a modern Digital Audio Workstation package (DAW)  and then run through a conversion process for reasons I’ll outline below.

1/ The music is incoherently structured. 
One of the powers of Sega’s Music Macro Language is the ability to use nested loops and subroutines. When used wisely, these radically reduce data duplication and therefore save a lot of space. Music is inherently repetitive, especially when divided into individual channels of audio. When studying Camino, it’s apparent the subroutines have been automatically generated, rather than created by hand. Rather than a subroutine containing a musical pattern that make sense in isolation, subroutines frequently start and end at illogical points from a composition perspective. Many of the subroutines are called just twice whereas you’d expect, especially with repetitive channels containing drum patterns, a much greater degree of reuse. 

M2 were on point for writing tooling to identify repeated sections of data. Theoretically, it’s a smarter, faster approach than attempting to optimize by hand. However, it’s a difficult problem to solve well and the results are only as good as the algorithm. And in this case, the results are mediocre. Aside from badly structured subroutines, the tooling created subroutines that are called just once, rendering them pointless. And furthermore they’d overlooked a separate problem further up their toolchain...

2/ The music does not adhere to the inherent timings of the audio engine. 
As Cmonkey explained in his documentation: the overall tempo of the tune is controlled by timer A on the Yamaha 2151 sound chip. This timer is loaded with a value of 524 during initialisation of the audio engine.  The calculation used for the timer A period (in ms) is:

   tA = 64 * (1024 - tAvalue) / input clock (KHz)

The sound chip has an input clock of 4 MHz (4000 KHz).  So this means the timer A period is calculated as:

   64 * (1024 - 524) / 4000 = 8ms

So, to play a note for 1 second, you'd pass a value of 125 as the duration (125 * 8ms = 1000ms = 1s).

Now, where Camino a Mi Amor falls foul of this system is that its core timing is not divisible by units of 8ms. As such the music is quantized to fit the audio engine’s timing, ensuring the notes align to 8ms boundaries. Let’s look at a typical sequence of notes to clarify this point. This series of commands simply plays the note D at octave 4 a number of times with a few rests thrown in for good measure. 


Command
Time V1
Time V2
D4
57
58
D4
28
27
D4
14
14
D4
14
14
REST
15
15
D4
14
14
REST
14
14
D4
14
15
D4
29
28


Length
199
199


So far so good. However, the second time this sequence is exported from the DAW to MML, there are subtle timing differences:

  1. The first version of this sequence plays D4 for a length of 57, which is 456ms (57 * 8).
  2. However, the second version of this sequence plays D4 for a length of 58, which is 464ms (58 * 8).
  3. This disparity is offset by the second use of D4 in the sequence, where the timing is inverted. 
Both versions of the sequence last the same total duration, but the notes are aligned differently. Imagine the original composer setting a chosen tempo in his audio software. When the exporter reached the second version of the sequence, it was quantized to the closest possible duration, in order to work with the default audio engine timing. The second time round, the quantization was applied to different notes in the sequence. The difference is inaudible to the ear and, in fact, an artefact of M2’s tooling, rather than a deliberate artistic choice. The timing differences also affect the drum patterns, which you would expect to be rigid, rather than variable. It should also be noted that the timing differences are only ever +/- 1. Any additional difference would be an artistic choice. To compound the problem, the tooling inserts additional ‘REST 1’ commands in various sequences to compensate for the timing differences, which wastes further space.

For file size, this is a critical problem. Each version of the sequence is now treated as a separate block of data, rather than a shared subroutine. It’s effectively different from a data perspective, despite sounding identical. This is part of the reason the previously described subroutine automation is a failure. It is fed imperfect data to process and cannot identify sections of the audio that should be identical. Whilst my example shows just two versions of the same sequence, in reality there are often many more. This is incredibly wasteful, as well as making the resultant MML unwieldy.

We’re faced with bulky MML, littered with illogical subroutines, that needs a major restructure to wrestle it into shape. I tackled the problem by listening to each channel of audio in isolation and capturing it to a waveform. This helped build a mental and visual image of the structure of the music channel. The next part of the process wasn’t an exact science, but I started visually identifying chunks of MML data that looked similar, unrolling subroutines where necessary. I built a Google Sheet that would help me do this.


I could simply copy and paste two giant blocks of MML data that I suspected were identical into the sheet. The sheet formulae would verify the list of commands were in fact identical, verify the timing of each command didn’t differ by more than +/-1 timing unit and finally sanity check that the overall timing of the block was identical. Once happy, I could return to the MML, remove the obfuscated original data and subroutines and move them to a shiny clean subroutine. 

Effectively, I was consolidating all of the data variations back into a coherent section of music. Some of these could be reused multiple times, which was a huge optimization. If you think back to the previous example with two versions of the same sequence, there is no reason both of these sequences shouldn’t be identical, as long as the overall timing of the block is the same. The upside to this, is that we’re returning to the vintage 1986 Hiro approach of hand-crafting MML. We can make genuine use of powerful loops and smartly organised subroutines. 

I’ve made this process sound a breeze, but in reality it was time consuming and error prone.  With over 10,000 lines of MML data to work with for the first track alone, one small error could throw the timing of the entire tune, especially if the error was contained in a loop that was iterated over multiple times. I found I could manage 2 to 3 hours of this work at a time, before needing to call it quits. Despite that, it is an incredibly fun puzzle to crack. My score was the byte count. Every time I hit recompile, my savings were output to the console. The lower the score the better I felt. Sometimes I needed to increase the overall size in the short-term as a strategy to reduce it considerably in the long-term. I’m unsure whether this process could be automated to produce MML that was as clean. Maybe it could and I just don’t want to admit it. Certainly, it would be easier to improve M2’s tooling to create better MML in the first place, if I had access to it. 

3/ Cross channel optimizations are missed. 
Wait, we’re not done yet! There were other easy trends to spot. For example, FM channel 0 and FM channel 1 shared a bunch of note data. I suspect the conversion tooling did not work across channels. It was trivial to move this into its own subroutine. 

4/ The REST command is everywhere! 
For FM channels, the REST command largely serves a purpose. It’s akin to depressing the note you’re playing. However, for percussion channels it serves less of a purpose. Consider the following sequence of commands:

    KICK_DRUM 42
    REST 10
    KICK_DRUM 14

This translates to: 
  • Play the kick drum sample. Wait 336ms (42*8).
  • Rest for 80ms (10*8).
  • Play the next kick drum in the sequence. 

The technicality to note is that once a sample is initiated, it can only be interrupted by another sample. The REST command adds little value, beyond inserting a delay before the next command. Therefore, the above block can be optimized to:

    KICK_DRUM 52
    KICK_DRUM 14

We’ve shaved 2 bytes from this 6 byte sequence! This might not sound much in isolation, but when the command is littered across all percussion channels, you can claw back a considerable number of bytes and save Z80 cycles in the process.

Generally speaking, for FM channels the REST command should be left well alone. Removing REST commands would change the way notes sustain and decay. However, there are exceptions to this rule. Earlier, I mentioned M2’s tooling had inserted ‘REST 1’ commands in the FM channels to compensate for audio timing differences. This was particularly obvious when comparing two identical blocks. One might look like this:

F4 14
  REST 1
  F4 28
  REST 14

The second might look like this:

      F4       15
      F4       28
      REST     14

The first block adds an 8ms rest between the two F4 notes. The second block adds the delay to the time the note is played for and does away with the REST command entirely. Therefore, both versions could be condensed into the succinct second version. This optimization might appear to be a leap of faith, but it does become apparent as artefact removal when analyzing 10,000 lines of MML by hand! I studied both variations in a wave editor and found no visual difference, let alone an audible one. In reality the block would be longer than the example provided of course.  

5/ Patches and Erroneous commands.

My MML decompiler performs other handy analysis. For example, it denotes which FM patches (or FM sounds if you like) are in use by the track. The unused patches can quickly be removed by hand. Furthermore, the MML contained junk data. For example you’d see command sequences as follows:

  LOAD_PATCH 6
  REST 10
  LOAD_PATCH 16
  C4 10

Clearly the initial LOAD_PATCH command is trumped by the second and can be removed. There's no need to load the first sound patch, as no notes are played! There were other examples of redundant commands that also provided a small but welcome saving. 
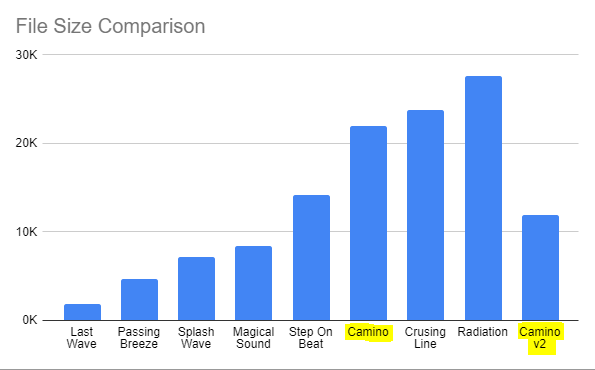

In Conclusion

In total, the above methods sliced a whopping 10k from the original track - a saving of 46% - with hopefully no loss of musical integrity! But this hard work is only just the beginning, and soon I'll need to tackle the next track - Cruising Line.


Parting Words

I’m frequently asked if a feature or idea is possible. Can something be done? Couldn’t you just…? And the answer is often theoretically yes. Yes, if you’re prepared to pour time and energy into seeing a hair-brained scheme through to fruition. Of course, you could, and maybe should, view this entire process as complete madness. All this effort to trim mere bytes from a binary file: reversing the MML format, cmonkey’s robust tooling to create and compile MML files, the decompiler to reverse 3DS binaries back into an editable format, countless evenings spent manually manipulating data with a hodgepodge of makeshift tools. And we’re nowhere near done yet, but let’s keep going, because no one else will!